Creating Assignments

Each assignment belongs to a course and lesson, so from the Assignments menu you need to first select course and lesson. Then you can create assignment for it.

This is pretty simple – just write the requirements you have and the students will be able to submit their solutions. There is an option to allow file upload as a solution to assignment.

create-homework


Note that by default assignments are optional. If you want a homework to be approved  before the associated lesson can be completed, you need to select the assignment in the Edit Lesson page.

Every user with privileges to administrate the LMS can review and approve or reject assignments on the lessons.

Creating Lessons

To create a lesson go to the Lessons menu under Namaste! LMS and create one. All the content and media you want to include can be included inside the lesson just like in any regular WordPress post. Any content provided by third party plugins (usually through shortcodes) can also be included.

Each lesson has:

  • Course it belongs to
  • Lesson access setting. At the time of creating it says that there are no other lessons, but once you save it, you will be able to see all other lessons in the course. You will be able to select some of them to be completed before this course becomes accessible.
  • Lesson completeness. You can require manual approval by admin, completed assignments, or a Watu or WatuPRO quiz to be completed with given result.

create-lesson

There are also two shortcodes you can use:

  • The namaste-todo shortcode will display the items still required to have the lesson completed. This may be a quiz, assignment etc.
  • The namaste-mark shortcode lets you include a “Mark as completed” button so the student can decide themselves when the lesson is completed. If such button is included in the lesson it will not be marked as completed until the student does it! The button will appear only after the “Lesson Completeness” requirements are satisfied.


Note that lessons by default don’t show up on your homepage. If you wish to show them, you need to enable the following setting at Namaste! LMS Settings page:

Creating Courses

To create a course in Namaste! LMS go to the Courses menu and create one. The courses are just custom WordPress posts so the interface for creating them will be familiar to you.

Several shortcodes can be used to help you with the course:

  • The shortcode namaste-enroll will display enroll button for logged in users. For non-logged in users it will display text “You have to be logged in”
  • You may want to display enroll buttons for all your courses in a separate page – for example in table or something like that. To do this you need to use a shortcode like namaste-enroll course_id=X where X is the course ID. You can find the exact shortcode for your course on the Edit Course page.
  • The shortcode namaste-course-lessons will display all the lessons available in this course. You can enable various sorting options, check the internal Help page under Namaste! LMS for more information on this and all shortcodes.
  • The shortcode namaste-todo displays the required lessons that has to be completed to complete the course. Courses that are already completed by the logged in user will not be shown here.

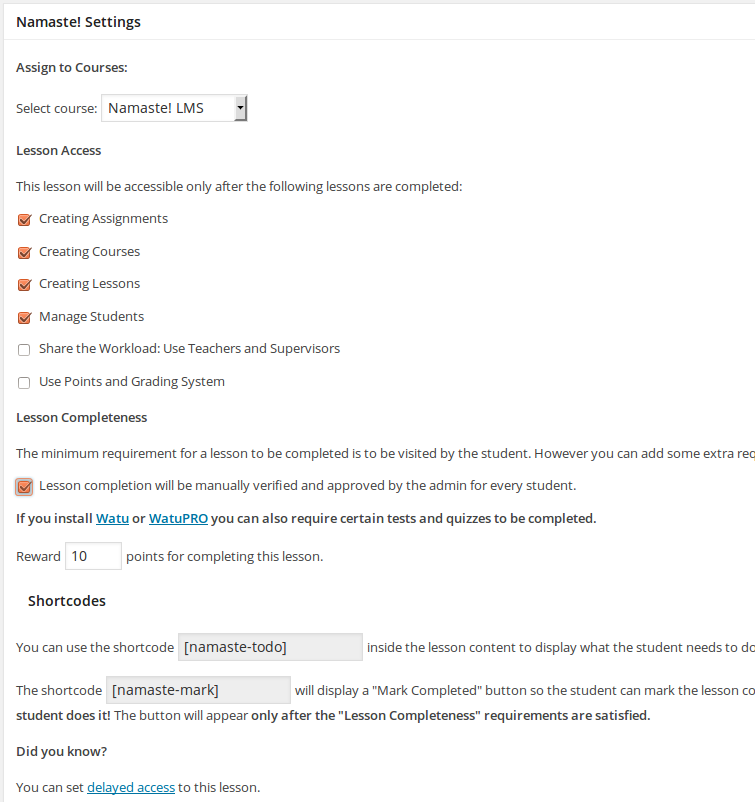
Under the area for writing content, there is a box with Namaste-specific settings.

create-course

In addition to the shortcodes you can decide whether you want users to be able to enroll to the course themselves or only the administrator will be able to enroll them (or approve their requests). Students can enroll either by clicking the button on the course front-end or through the My Courses menu in their dashboard.

Each course can have pre-requisites, i.e. it may require other courses to be completed before the student can enroll.

You can also select which of the course’s lessons must be completed to complete the course. The course doesn’t require all lessons by default, so you can make some optional.

Note that courses by default don’t show up on your homepage. If you wish to show them, you need to enable the following setting at Namaste! LMS Settings page:


Namaste! Reports

This addon lets you run advanced reports on user’s performance in the LMS.

You can enroll in this course from your student dashboard. You need to be logged in (see the linked page for details how to log in).

Namate! Connect

Namaste! Connect is a simple module which allows you to automatically send emails and/or dashboard notices when certain actions happen in the LMS.

You can enroll in this course from your student dashboard. You need to be logged in (see the linked page for details how to log in).

Namaste! LMS

This is the first demo course. It will show you what the free Namaste! LMS plugin can do. The course consists of several lessons:

(We have used the shortcode namaste-course-lessons to display the above list).

You can enroll in this course here: You can enroll in this course from your student dashboard. You need to be logged in (see the linked page for details how to log in).

In order to complete this course you need to complete all its lessons. You can see below what is still left to be completed:

(we generated this using the namaste-todo shortcode).