How To Display Relevant Courses / Modules / Lessons on the Sidebar

Namaste! LMS provides handy shortcodes for displaying current course’s lessons and modules, and module’s lessons. You can even pass course or module ID to the shortcodes to display the modules or lessons that belong to another course / module. So far, so good, but how do you display this in the sidebar?

Installing the Widget Context Plugin

There is an excellent free plugin called Widget Context that takes care to display widgets only on selected post types. Install it and activate it. You’ll most likely want to display different widgets on the different types of pages. Also, you’ll probably not want to display these widgets on your regular non-LMS pages (contact & about pages, blog posts, etc).

Course Pages

Normally what you’ll want to display on a course page is the list of lessons in the course and/or (if you use modules) a list of modules in it. This can’t be easier:

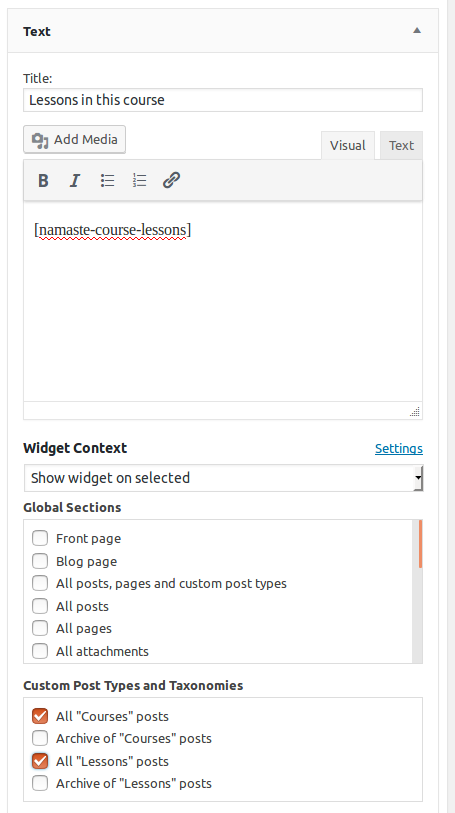
  • Create a text widget and place it in the sidebar.
  • Insert the shortcode
      or
        in it depending on what you want to show (you can create one widget for each if you prefer)
      • Select that this widget will be shown only on “Courses” pages (or maybe you want to use the same widget on your modules & lessons page – no problem, Namaste! LMS shortcodes are smart enough to figure out the lessons related to the course regardless if you are on the course page itself, or a module / lesson belonging to that course).
      • Here’s an example:

      You can see how this works in our demo.

      Module Pages

      On module pages you’ll probably want to show lessons in this module and modules in this course. Similar to the above:

      • For “lessons in this module” use
          shortcode and place it in a widget that is shown only on “Module” pages.
        • For “modules in this course” use
            shortcode and place it in a widget that is shown only on “Module” pages.

          It’s probably not wise to include all lessons in the course but if you want to do it, just enable the widget from the previous example on “Module” pages as well.

          Lesson Pages

          On lesson pages you may want to show all lessons in this course, or if you use modules also the modules in this course, the lessons in this module.

          • In our first example displaying all lessons in this course is already done and the same widget is enabled for “Lessons” posts. If you want to use different widget (or don’t show lessons on course pages) just use the shortcode
              without ID parameter (so just use it as you see it here) again and enable the widget for lessons.
            • To show modules in this course use
                in such widget.
              • To show lessons in the same module use
                  without using ID parameter and enable the widget for Lessons posts. You can even use the same widget on module pages.

                That’s it, quite simple. If you think other existing shortcode should have course / lesson / module relevant behavior let us know.

                Do not use any of the shortcodes without ID attribute on archives or search results pages because the system won’t know which is the current post they relate to. Using the shortcodes without ID makes sense only on pages that show a single course, lesson or module.

                How To Add Custom Requirements To Complete a Lesson

                By default Namaste! LMS lets you set the following requirements to complete a lesson:

                • Manual admin approval
                • Completing homework / assignments
                • Completing quiz / test
                • Manually clicking on “Mark completed” button

                Since version 1.8.1 Namaste! LMS introduces new actions and filters that let you create custom plugins that will set lesson completion requirements. You can use this for example to integrate with plugin like Gravity forms, to have a game completion requirement, points earned from other plugin, or just literally everything.

                Warning: programming stuff ahead.

                Here are the steps you need to perform to do this with a bit of sample code:

                1. Display and save your custom requirements in the Edit Lesson page. To do this you need to use the action called in lesson-meta-box.html.php:

                do_action(‘namaste-lesson-requirements’, $post);

                Here is how to use it:

                a) In your plugin’s init() function add the output action:

                add_action('namaste-lesson-requirements', 'my_plugin_lesson_requirements');
                

                b) Create the function “my_plugin_lesson_requirements” and output checkboxes, radio buttons, drop-downs or whatever you need to do to allow the user to select custom requirements:

                function my_plugin_lesson_requirements($lesson) {		
                   $current_state = get_post_meta($lesson->ID, 'my_plugin_test', true);
                   echo 'Just a test: <input checked="checked" name="my_plugin_test" type="checkbox" value="1" /&gt;';
                } 
                

                The checkbox above is just hardcoded but you should be getting the idea. If for example you are asking for some form completions, you need to list all your forms with checkboxes, radio buttons, or in a drop-down and let the editor choose.

                c) In your plugin’s init() function add the save action:

                add_action('save_post', 'my_plugin_save_lesson');

                d) Then your function should save the selection:

                function my_plugin_save_lesson($post_id) {
                   if ( defined( 'DOING_AUTOSAVE' ) && DOING_AUTOSAVE ) return;
                   if ( !current_user_can( 'edit_post', $post_id ) ) return;
                   if ('namaste_lesson' != $_POST['post_type']) return;
                   // sanitize and validate your data yourself!!!
                   update_post_meta($post_id, "my_plugin_test", $_POST['my_plugin_test']);
                }

                So far so good. You are displaying a requirement and saving it. Now you need to handle two more things:

                2. Check the requirement Namaste! LMS user tries to complete a lesson. To do this you must use the namaste-lesson-other-requirements filter which Namaste! LMS calls like this:

                apply_filters(‘namaste-lesson-other-requirements’, $current_status, $lesson_id, $student_id);

                Here is how to do it:

                a) In your plugin’s init() function declare the filter:

                add_filter('namaste-lesson-other-requirements', 'my_plugin_is_lesson_ready', 10, 3);

                b) Then create the function:

                function my_plugin_is_lesson_ready($other_requirements, $lesson_id, $student_id) {
                   if($other_requirements) return true; // very important!!! if other plugin has set this to true, just return true
                   // IF there are unsatisfied requirements in your custom code, return true
                   return false; // if no, return false
                }

                Finally, you should take care to output proper information in the lesson-todo function and the lesson-todo shortcode:

                3. Handle lesson to-do information:

                To do this you need to use the “namaste-lesson-other-todo” which Namaste! LMS defines like this:

                apply_filters(‘namaste-lesson-other-todo’, $other_todo, $lesson_id, $student_id);

                So, step by step:

                a) In your plugin’s init() method declare the filter:

                add_filter('namaste-lesson-other-todo', 'my_plugin_lesson_todo', 10, 3);

                b) Then create the function:

                function my_plugin_lesson_todo($other_todo, $lesson_id, $student_id) {
                   // select what this student need to do from your plugin - queries not shown here
                   // for anything that they have to do, APPEND it to $other_todo in a "li" tag:
                   foreach($my_plugin_items as $item) {
                     $other_todo .= '<li>'.$item->title.'</li>'."\n";
                   }
                   return $other_todo;
                }

                It’s very important to append your output to $other_todo because other plugins may have modified the variable too. It’s also important to put each item into a “li” tag.

                How To Create Your LMS Without WordPress Dashboard for Students

                Many of the LMS users don’t want their students to access the content through the standard WordPress dashboard and the default “My Courses” menu link. This post will explain how you can do this step by step.

                Note: this post explains the slow and free method of doing this. There is also fast and easy method: by purchasing the Namaste! LMS Theme which does all this automatically with just a few clicks.

                1. Hide the dashboard

                Obviously you need first to restrict the access to the dashboard. You can do this by hacking your WP theme or, much easier, by using a plugin like Remove Dashboard Access. There are more options to do this shown here.

                Don’t do stupid things like protecting the whole wp-admin directory with .htaccess. This will stop plugins using ajax from working properly. And you will be using such plugins if you want to run quizzes.

                2. List your courses

                With or without the “My courses” page and the shortcode that exposes it, you need some way for the users to access the courses you offer.

                We recommend to use the namaste-mycourses shortcode because it will dynamically show the courses with enroll buttons, links to lessons etc. But you can also work without it by simply publishing a page with all your courses and include enroll button in each of them.

                3. List the lessons

                There are several ways you can list the lessons without using the dashboard.

                a) Use the namaste-mycourses shortcode which will repeat the dashboard. You will still need to use option b) in this case so the student can access the lessons from the course page.
                b) Use the shortcode namaste-course-lessons inside the course contents. It will automatically list all the available lessons in the course with links to them. Check the internal Help page for more information about setting up your preferred ordering criteria
                c) A third way to handle this would be to again use namaste-course-lessons shortcode but outside of the course page. Maybe you’ll want to manaually list all courses and lessons, or loop through courses inside your theme. the second argument of the shortcode allows you to specify course ID. So you can list courses and then use the shortcode like namaste-course-lessons status 5 to list the lessons in course with ID 5.

                4. Handle assignments

                You may want to include assignments to your lessons. Through the dashboard there are automated links to the assignments so it’s easy. But how to handle the things if you don’t use dashboard?

                Use the namaste-assignments shortcode. It can be used inside the lesson contents in which case the shortcode needs no arguments. In case you want to list assignments in some other way (for example on a table with all the lessons in the course) you need to pass the lesson_id artument like this:

                namaste-assignments lesson_id=”8″

                You can do this multiple times on the page in case you want all lessons and their assignments to be shown in one place.

                This shortcode will take care to automatically generate “submit solution” and “view solutions” links.

                5. Certificates

                User’s earned certificates can also be exposed outside of the dashboard. Just use the namaste-mycertificates shortcode on a designated post or page.

                6. Reports

                If you have the Namaste! Reports module you can also show the advanced reports using shortcodes. To display the user’s own reports use the shortcode namaste-reports-user. If you are building a site where student’s reports can be seen by anyone else, you can use the shortcode by passing user ID as second parameter like this: namaste-reports-user 2.

                The user’s rankings can also be displayed using the namaste-reports-rank shortcode. You can copy it directly from the User Rankings page in your administration as it includes some parameters.

                7. General advice

                Ideally you don’t want non-logged in users to see all those “My courses”, “My certificates” etc links on your site because they can’t use them until they log in. So you may want to either create a separate page “My LMS” or something like that and list the links on it (with a warning that users should log in), or use is_user_logged_in() in your blog theme to make the links conditionally show or hide.