Using Namaste! LMS WIth a Membership Plugin To Sell Subscription Access

Namaste! LMS can be used with any membership plugin. Courses, modules, and lessons are just custom post types so any plugin which allows protecting custom post types will do the work. Here we have created a quick and easy guide about selling membership access Namaste! LMS content by using the plugin Paid Membership Subscriptions. It’s a free and very easy to use plugin.

But first:

Why Use a Membership Plugin?

You don’t need to. Namaste! LMS already allows you to charge for courses even in it’s free core. With the Pro version you can add things like delayed access, discount codes, and so on. You can also sell access to courses through WooCommerce using our free WooCommerce bridge. So you do not need to use a membership plugin to make money with paid course.

There are two cases when going the membership route makes sense:

  • You are already using membership subscription plans on your site. It may (or may not) make sense to include the LMS content in some of your membership plans.
  • You want to charge your users at recurring basis rather than per-course. This is not too common in the LMS world but is an absolutely valid approach.

Because of the many existing membership plugins we decided not to build such a redundant functionality in Namaste! LMS. So you can just use some of the existing plugins with the LMS.

Using The Free Plugin Paid Membership Subscriptions

This plugin is really easy and good and deserves more popularity. The reason we are choosing it for this guide is that their free version is perfectly compatible with Namaste! LMS and you can use it as is. It’s always a good idea to have a look at what they offer as a Pro version however.

So, here’s how to use it with Namaste! LMS step by step:

  1. Install and activate the plugin (you don’t say!)
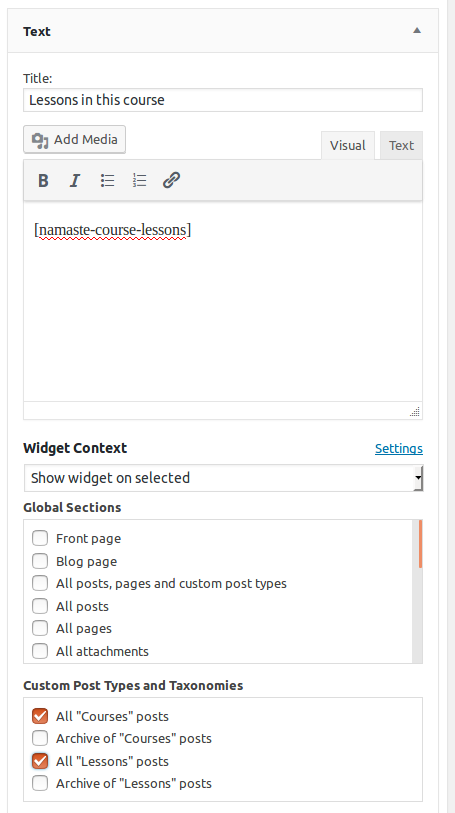
  2. Create one or more subscription plans:

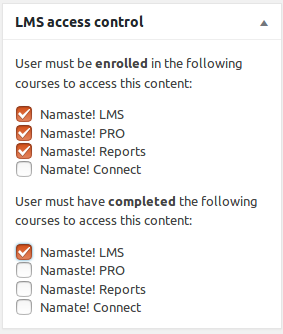
Go to edit a course, lesson, or module and restrict the access to it for users subscribed for your membership plan:

That’s it. You can of course have multiple plans attached to multiple courses, and so on. You can explore the documentation of the memberhsip plugin on the official WordPress repository page to learn about all the configurations. But it will work well even with these default settings.

Student Reviews on Courses

From version 2.5.5 Namaste! LMS supports student reviews on completed courses. The option is enabled per course basis so you can keep it off for some courses:

checkboxes to accept reviews

If you select the checkbox to hold reviews for moderation, the reviews will not be displayed before you approve them.

Just enabling the checkboxes will not allow students to place reviews. You need to also use the shortcode where X is the course ID. The review box will be shown in the place where you have pasted the shortcode:

form for submitting review

The form will appear only after the student has completed the course. For this reason it’s better not to place any text like “Please review this course” before the shortcode. Instead, enclose it in the shortcode so it appears along with the form only when appropriate.

After the student has submitted a review, they are not able to change it or submit another.

By using the   you can display the latest 10 reviews on the course page (or any other page).

This is how the published reviews look:

On the admin side

The pending and published reviews will appear in the Student Reviews page in your Namaste! LMS menu. You can filter them by course and status.

You can delete reviews any time and approve these who are pending approval:

Manage reviews page

If you are using classes / groups from Namaste! PRO the class managers will have access only to the reviews for courses, accessible by them. This in case you have chosen to enable access to reviews at all for their role (From the Namaste! LMS Settings page -> Roles that can manage -> Fine-tune these settings).

Creating and Assigning Quizzes and Exams

To avoid reinventing the wheel Namaste! LMS integrates with two powerful plugins for creating tests and quizzes:

  • Watu – fully functional free plugin sufficient for most simple quizzes
  • WatuPRO – the most powerful WordPress quiz plugin priced between $47 and $137

Choose one of these plugins for your quizzes. You can start with Watu and upgrade to WatuPro any time you decide.

Getting Started

You have already created some courses and lessons. Now you want to start creating some exams and complete lessons based on them. To do this you need to install and activate the quiz plugin Watu or WatuPRO. Once activated go to Namaste! LMS Settings page and select that you want to use the plugin to handle exams / tests:

There are a couple of self-explanatory settings which you can select for better integration.

Creating Your Tests

To create your tests you need to go to the Watu or WatuPRO link in your administration and create them. Both plugins are very intuitive and have quick getting started guide to help you start creating your tests.

When you are done, don’t forget that the tests should be published – either by placing the shortcode inside a post or page, or even inside a Namaste! LMS lesson, or by seleting “Automatically publish this quiz…” checkbox at the time of saving it:

Assigning a Test to a Lesson

Once you have published one or more tests you can assign each of them to a lesson in Namaste! LMS. Go to Lessons -> Edit Lesson and you’ll see the following selector:

It lets you select a single exam that will be required to be completed in order to complete the lesson. This is optional: you can and probably will have a lot of lessons that do not require any test to be completed.

Selecting “Grade” is also optional and will be shown only if you have defined grades for the test in Watu or WatuPro. You can select one or more grades to be required to consider the lesson completed. In the above example we require “Passed” grade. But if your test has grades like A, B, C, D, F maybe you will allow A, B, or C to be the grades that ensure passing the lesson.
Be careful: if you require certain grade(s) you probably have to allow multiple attempts on the test (both Watu and WatuPRO have such setting) – otherwise a student who fails to achieve any of the desired grades will never be able to complete the lesson!

Grading a Lesson Based on Test

Maybe you have noticed the checkbox on the image above: “The grade from the quiz automatically becomes grade for the lesson…”. The checkbox becomes available only if you have selected “Use a grading system” in the Namaste! LMS Settings page:

In order to successfully transfer a grade from the test to the lesson (in the Namaste! LMS gradebook) you need to have same grading systems in Namaste! LMS and in the quiz. For example if you have defined Failed and Passed as quiz grades, then your Namaste! LMS grading system should only contain Passed and Failed.

Another example, here’s a commonly used grading system:

This means the quiz should also have such grades if you want them to be automatically transferred. So if the user gets “B” on the test, they’ll get B on the lesson. The grade title in Watu / WatuPRO should be exactly “B” in this case. Not “B+”, a word like “Good”, or a number.

Navigation and User Interface

The easiest way to link from the lesson to its required exam is to use the [namaste-todo] shortcode inside the lesson. This way Namaste! LMS will automatically output information and links to everything that is required – assignments, exam, admin approval, etc. At the end of the exam, using the “Final page / Quiz output” box, just give a link back to the lesson. When the user completes the test they’ll be taken back to see that the test is done and (maybe, depending on your requirements) the lesson is also completed.

Alternatively you can of course just link to the exam from the lesson contents, but this link will not dynamically hide when the test is completed.

Access Control: Restrict Any Site Content Based on Course Enrollment or Status

From version 1.4.3 Namaste! PRO enables a very important new feature: access control to any site content.

What Is It Exactly?

The new access control feature let’s you restrict the access to any post, page or custom post type (special content created by many plugins or themes) based on any (or both) of the following criteria:

  • User is enrolled in selected course(s)
  • User has completed selected course(s)

Once such restrictions are enabled for a post or page, that content is no longer accessible to non-logged in users (unless you un-select the courses). The users who have not enrolled or completed the desired courses will get a message saying that they must do it before they can access the page.

Users who satisfy the requirements will see the page without any other notices.

Note that administrators will always see all content – the restriction will not be imposed on them.

How To Enable It?

First, enable the feature from Namaste! LMS Settings page:

If you enable it, your Add/Adit Post (or other content type) pages will get a box on the sidebar listing all your existing courses:

You can select as many of them as you like and define enrolled or completed criteria.

If all courses are unchecked in both sections the post / page remains accessible to everyone (including non logged in users) as usual.

How To Display Relevant Courses / Modules / Lessons on the Sidebar

Namaste! LMS provides handy shortcodes for displaying current course’s lessons and modules, and module’s lessons. You can even pass course or module ID to the shortcodes to display the modules or lessons that belong to another course / module. So far, so good, but how do you display this in the sidebar?

Installing the Widget Context Plugin

There is an excellent free plugin called Widget Context that takes care to display widgets only on selected post types. Install it and activate it. You’ll most likely want to display different widgets on the different types of pages. Also, you’ll probably not want to display these widgets on your regular non-LMS pages (contact & about pages, blog posts, etc).

Course Pages

Normally what you’ll want to display on a course page is the list of lessons in the course and/or (if you use modules) a list of modules in it. This can’t be easier:

  • Create a text widget and place it in the sidebar.
  • Insert the shortcode
      or
        in it depending on what you want to show (you can create one widget for each if you prefer)
      • Select that this widget will be shown only on “Courses” pages (or maybe you want to use the same widget on your modules & lessons page – no problem, Namaste! LMS shortcodes are smart enough to figure out the lessons related to the course regardless if you are on the course page itself, or a module / lesson belonging to that course).
      • Here’s an example:

      You can see how this works in our demo.

      Module Pages

      On module pages you’ll probably want to show lessons in this module and modules in this course. Similar to the above:

      • For “lessons in this module” use
          shortcode and place it in a widget that is shown only on “Module” pages.
        • For “modules in this course” use
            shortcode and place it in a widget that is shown only on “Module” pages.

          It’s probably not wise to include all lessons in the course but if you want to do it, just enable the widget from the previous example on “Module” pages as well.

          Lesson Pages

          On lesson pages you may want to show all lessons in this course, or if you use modules also the modules in this course, the lessons in this module.

          • In our first example displaying all lessons in this course is already done and the same widget is enabled for “Lessons” posts. If you want to use different widget (or don’t show lessons on course pages) just use the shortcode
              without ID parameter (so just use it as you see it here) again and enable the widget for lessons.
            • To show modules in this course use
                in such widget.
              • To show lessons in the same module use
                  without using ID parameter and enable the widget for Lessons posts. You can even use the same widget on module pages.

                That’s it, quite simple. If you think other existing shortcode should have course / lesson / module relevant behavior let us know.

                Do not use any of the shortcodes without ID attribute on archives or search results pages because the system won’t know which is the current post they relate to. Using the shortcodes without ID makes sense only on pages that show a single course, lesson or module.

                School Accounts

                This feature is available from Namate! PRO 1.3.3.

                Overview

                School accounts let you sell access to courses and classes to school, groups, private teachers, marketers etc. You can set both individual and school prices to courses or classes.
                School accounts are not different than student accounts except that they get a simple dashboard and a school signup code. When a student registers with the code, they become a student of the school and get free access to courses and classes/groups that the school has access to.
                This is explained in more details in the “Student’s Registration and Access” section at the end of this article.

                Note that the user role of school account owners must be enabled as role that has access to learning material (in Namaste! LMS Settings page).

                Administration

                To enable the feature go to Namaste! LMS -> School Accounts page and enable it:

                Let’s elaborate:

                • The option “Automatically assign students to the classes that the school account is assigned to” will automatically sign up any student registered under the school in the classes/groups the school has purchased as school account. If you don’t select the option the students will still be able to sign up the classes manually. If some of the classes requires a signup fee, the fee will be void for the school student and they’ll be able to sign up for free.
                • The second option defines whether your default WordPress registration page will allow signup under a school or not. If not, only a registration page visited with the special URL will allow such sign up. The URL is also available in the School’s dashboard so your clients can give it to their students.

                Under the global settings you’ll see your courses and classes / groups. For each course or class you can define a price for school sign-up. Use the corresponding shortcode to publish a sign-up button anywhere on your site. Signing up as school is possible only through this button. If you want to charge for school signups make sure you have entered some payment settings in your Namaste! LMS settings page. Currently school account signup is integrated with Paypal and Stripe payments and you can’t use any of the additional payment bridges for other gateways.

                For each course or class you can see and manage the accounts signed up as school – add an account manually, or remove an account.

                At the top of the course you will see the welcome shortcode. You can use it anywhere on a page, before namaste-mycourses shortcode for example, or in your theme header to display a greeting for school students. It can help them know the school name they signed up under. The school name is defined by the school account owner in their school dashboard.

                The School’s Dashboard

                Once someone registers as school under any course or class/group, they get the School’s Dashboard. It’s called My School Page and a link to it becomes available under My Courses menu in their dashboard.

                The dashboard lets them:

                • Set a school name. The school name can be displayed by the shortcode you as admin can use (as explained in the previous section).
                • Get the school signup code and signup link. They can send this link to students they want signed up under them.
                • See classes and courses they signed up for.
                • See students signed up in their school.

                Student’s Registration and Access

                A student that signs up under a school is a regular Namaste! LMS student. However he gets access to the courses and classes/groups that the school account has signed up for. Let’s elaborate:

                • When a school account has bought a paid course, all students of the school can enroll that course for free. Students will never be automatically enrolled in a course however – they need to click the Enroll button.
                • When a school account is signed up for a class/group access, the students of the school will:
                  a) be automatically signed up for these classes upon registration IF this option is selected on the Manage School Accounts page by the site admin
                  b) be able to sign up for free for all these classes even if there is a fee otherwise.

                The school accounts feature is in beta stage. There is a lot more to come in terms of reporting and flexibility. We welcome your feedback.

                Grading

                The grading system in Namaste! LMS can be optionally enabled from the Namaste! LMS Settings page. There is no fixed grading system, neither predefined choices so you can use anything you want.

                In this article we’ll use one of the most common grading systems in the world with five letters: A, B, C, D, F. You can of course to choose grades like A-, B+ etc, a numeric grading system from 2 to 6 for example, a simple system having just “Fail” and “Pass” grades and so on.

                Setting The Grading System

                To configure a grading system you need to go to Namaste! LMS Settings page and check the checkbox as shown below:

                grading-system

                Spacing between commas does not matter and all the spaces will be trimmed from your grades (we have intentionally misplaced one of the commas in the example above).

                Once this is activated a menu “Gradebook” will appear under your Namaste! LMS menu. Upon selecting a course you will be able to see all students in it and assign grades to their lessons and courses.

                Grading Assignments

                Assignments can be graded by teachers / managers from the View Solutions page. These grades will then appear in the gradebook next to the lesson grade selector. They will not automatically grade the lesson but will be shown there to help the teacher decide about the lesson grade.

                Grading Lessons

                Lessons can be graded manually in the gradebook.

                They can also be graded automatically if you have assigned a Watu / WatuPRO quiz to the lesson.  How does this work:

                1. In the Edit Lesson page select that the quiz is required to complete the lesson:

                quiz-lesson

                2. It does not matter if you select specific grade(s) from the right selector. They have relation only to completing the lesson, not to grading it.

                3. Select the checkbox below as shown so the grade from the quiz is transferred as lesson grade.

                For this to work your quiz grade titles should match exactly the grades in Namaste! LMS. As you see in our example, quiz grades are A, B, C, D and F. So if the user achieves B on the quiz AND your grading system in Namaste! LMS contains grade “B”, the grade from the quiz will automatically become a grade for the lesson.

                Another example: if you have entered the Namaste! LMS grades as “Passed, Failed” your quiz grades should also be “Passed” and “Failed”.
                 

                Grading Courses

                Courses can be graded manually in the gradebook.

                Courses can also be graded automatically as an average from the lesson grades. To do this, on the Edit Course page select the checkbox that says “Automatically grade this course based on its lesson grades”:

                autograde

                When this is select grading will automatically happen at the time of completing the course. The grades of all the graded lessons will be gathered and an average grade will be found based on them. This happens by automatically assigning points to each grade position, then finding the average of these points and figuring out the corresponding grade. The following illustration explains it visually:

                grading

                The left side of the image shows how the selected by you grades are assigned points behind the scene based on their position (lowest start with 0 points and then it adds 1 point for each grade up). Then we collect the points for all lesson grades and divided by the number of lesson. The result is rounded to a whole number and the grade that has this number of points is assigned to the course. Lessons that have no grade assigned do not participate in the calculation and don’t increase the number of lessons the system divides on.

                One important thing to note: since this calculation happens at the time of completing the course, a grade which is given to lesson after that will take no effect. So if your latest lesson triggers course completeness and you want it to participate in the grading, it should be graded before completing the lesson – either manually, or automatically via assigned quiz.

                How To Add Custom Requirements To Complete a Lesson

                By default Namaste! LMS lets you set the following requirements to complete a lesson:

                • Manual admin approval
                • Completing homework / assignments
                • Completing quiz / test
                • Manually clicking on “Mark completed” button

                Since version 1.8.1 Namaste! LMS introduces new actions and filters that let you create custom plugins that will set lesson completion requirements. You can use this for example to integrate with plugin like Gravity forms, to have a game completion requirement, points earned from other plugin, or just literally everything.

                Warning: programming stuff ahead.

                Here are the steps you need to perform to do this with a bit of sample code:

                1. Display and save your custom requirements in the Edit Lesson page. To do this you need to use the action called in lesson-meta-box.html.php:

                do_action(‘namaste-lesson-requirements’, $post);

                Here is how to use it:

                a) In your plugin’s init() function add the output action:

                add_action('namaste-lesson-requirements', 'my_plugin_lesson_requirements');
                

                b) Create the function “my_plugin_lesson_requirements” and output checkboxes, radio buttons, drop-downs or whatever you need to do to allow the user to select custom requirements:

                function my_plugin_lesson_requirements($lesson) {		
                   $current_state = get_post_meta($lesson->ID, 'my_plugin_test', true);
                   echo 'Just a test: <input checked="checked" name="my_plugin_test" type="checkbox" value="1" /&gt;';
                } 
                

                The checkbox above is just hardcoded but you should be getting the idea. If for example you are asking for some form completions, you need to list all your forms with checkboxes, radio buttons, or in a drop-down and let the editor choose.

                c) In your plugin’s init() function add the save action:

                add_action('save_post', 'my_plugin_save_lesson');

                d) Then your function should save the selection:

                function my_plugin_save_lesson($post_id) {
                   if ( defined( 'DOING_AUTOSAVE' ) && DOING_AUTOSAVE ) return;
                   if ( !current_user_can( 'edit_post', $post_id ) ) return;
                   if ('namaste_lesson' != $_POST['post_type']) return;
                   // sanitize and validate your data yourself!!!
                   update_post_meta($post_id, "my_plugin_test", $_POST['my_plugin_test']);
                }

                So far so good. You are displaying a requirement and saving it. Now you need to handle two more things:

                2. Check the requirement Namaste! LMS user tries to complete a lesson. To do this you must use the namaste-lesson-other-requirements filter which Namaste! LMS calls like this:

                apply_filters(‘namaste-lesson-other-requirements’, $current_status, $lesson_id, $student_id);

                Here is how to do it:

                a) In your plugin’s init() function declare the filter:

                add_filter('namaste-lesson-other-requirements', 'my_plugin_is_lesson_ready', 10, 3);

                b) Then create the function:

                function my_plugin_is_lesson_ready($other_requirements, $lesson_id, $student_id) {
                   if($other_requirements) return true; // very important!!! if other plugin has set this to true, just return true
                   // IF there are unsatisfied requirements in your custom code, return true
                   return false; // if no, return false
                }

                Finally, you should take care to output proper information in the lesson-todo function and the lesson-todo shortcode:

                3. Handle lesson to-do information:

                To do this you need to use the “namaste-lesson-other-todo” which Namaste! LMS defines like this:

                apply_filters(‘namaste-lesson-other-todo’, $other_todo, $lesson_id, $student_id);

                So, step by step:

                a) In your plugin’s init() method declare the filter:

                add_filter('namaste-lesson-other-todo', 'my_plugin_lesson_todo', 10, 3);

                b) Then create the function:

                function my_plugin_lesson_todo($other_todo, $lesson_id, $student_id) {
                   // select what this student need to do from your plugin - queries not shown here
                   // for anything that they have to do, APPEND it to $other_todo in a "li" tag:
                   foreach($my_plugin_items as $item) {
                     $other_todo .= '<li>'.$item->title.'</li>'."\n";
                   }
                   return $other_todo;
                }

                It’s very important to append your output to $other_todo because other plugins may have modified the variable too. It’s also important to put each item into a “li” tag.

                How To Create Your LMS Without WordPress Dashboard for Students

                Many of the LMS users don’t want their students to access the content through the standard WordPress dashboard and the default “My Courses” menu link. This post will explain how you can do this step by step.

                Note: this post explains the slow and free method of doing this. There is also fast and easy method: by purchasing the Namaste! LMS Theme which does all this automatically with just a few clicks.

                1. Hide the dashboard

                Obviously you need first to restrict the access to the dashboard. You can do this by hacking your WP theme or, much easier, by using a plugin like Remove Dashboard Access. There are more options to do this shown here.

                Don’t do stupid things like protecting the whole wp-admin directory with .htaccess. This will stop plugins using ajax from working properly. And you will be using such plugins if you want to run quizzes.

                2. List your courses

                With or without the “My courses” page and the shortcode that exposes it, you need some way for the users to access the courses you offer.

                We recommend to use the namaste-mycourses shortcode because it will dynamically show the courses with enroll buttons, links to lessons etc. But you can also work without it by simply publishing a page with all your courses and include enroll button in each of them.

                3. List the lessons

                There are several ways you can list the lessons without using the dashboard.

                a) Use the namaste-mycourses shortcode which will repeat the dashboard. You will still need to use option b) in this case so the student can access the lessons from the course page.
                b) Use the shortcode namaste-course-lessons inside the course contents. It will automatically list all the available lessons in the course with links to them. Check the internal Help page for more information about setting up your preferred ordering criteria
                c) A third way to handle this would be to again use namaste-course-lessons shortcode but outside of the course page. Maybe you’ll want to manaually list all courses and lessons, or loop through courses inside your theme. the second argument of the shortcode allows you to specify course ID. So you can list courses and then use the shortcode like namaste-course-lessons status 5 to list the lessons in course with ID 5.

                4. Handle assignments

                You may want to include assignments to your lessons. Through the dashboard there are automated links to the assignments so it’s easy. But how to handle the things if you don’t use dashboard?

                Use the namaste-assignments shortcode. It can be used inside the lesson contents in which case the shortcode needs no arguments. In case you want to list assignments in some other way (for example on a table with all the lessons in the course) you need to pass the lesson_id artument like this:

                namaste-assignments lesson_id=”8″

                You can do this multiple times on the page in case you want all lessons and their assignments to be shown in one place.

                This shortcode will take care to automatically generate “submit solution” and “view solutions” links.

                5. Certificates

                User’s earned certificates can also be exposed outside of the dashboard. Just use the namaste-mycertificates shortcode on a designated post or page.

                6. Reports

                If you have the Namaste! Reports module you can also show the advanced reports using shortcodes. To display the user’s own reports use the shortcode namaste-reports-user. If you are building a site where student’s reports can be seen by anyone else, you can use the shortcode by passing user ID as second parameter like this: namaste-reports-user 2.

                The user’s rankings can also be displayed using the namaste-reports-rank shortcode. You can copy it directly from the User Rankings page in your administration as it includes some parameters.

                7. General advice

                Ideally you don’t want non-logged in users to see all those “My courses”, “My certificates” etc links on your site because they can’t use them until they log in. So you may want to either create a separate page “My LMS” or something like that and list the links on it (with a warning that users should log in), or use is_user_logged_in() in your blog theme to make the links conditionally show or hide.

                Creating Courses and Lessons

                This quiz will help you check your knowledge about creating courses and lessons in Namaste! LMS.