Access Control: Restrict Any Site Content Based on Course Enrollment or Status

From version 1.4.3 Namaste! PRO enables a very important new feature: access control to any site content.

What Is It Exactly?

The new access control feature let’s you restrict the access to any post, page or custom post type (special content created by many plugins or themes) based on any (or both) of the following criteria:

  • User is enrolled in selected course(s)
  • User has completed selected course(s)

Once such restrictions are enabled for a post or page, that content is no longer accessible to non-logged in users (unless you un-select the courses). The users who have not enrolled or completed the desired courses will get a message saying that they must do it before they can access the page.

Users who satisfy the requirements will see the page without any other notices.

Note that administrators will always see all content – the restriction will not be imposed on them.

How To Enable It?

First, enable the feature from Namaste! LMS Settings page:

If you enable it, your Add/Adit Post (or other content type) pages will get a box on the sidebar listing all your existing courses:

You can select as many of them as you like and define enrolled or completed criteria.

If all courses are unchecked in both sections the post / page remains accessible to everyone (including non logged in users) as usual.

School Accounts

This feature is available from Namate! PRO 1.3.3.

Overview

School accounts let you sell access to courses and classes to school, groups, private teachers, marketers etc. You can set both individual and school prices to courses or classes.
School accounts are not different than student accounts except that they get a simple dashboard and a school signup code. When a student registers with the code, they become a student of the school and get free access to courses and classes/groups that the school has access to.
This is explained in more details in the “Student’s Registration and Access” section at the end of this article.

Note that the user role of school account owners must be enabled as role that has access to learning material (in Namaste! LMS Settings page).

Administration

To enable the feature go to Namaste! LMS -> School Accounts page and enable it:
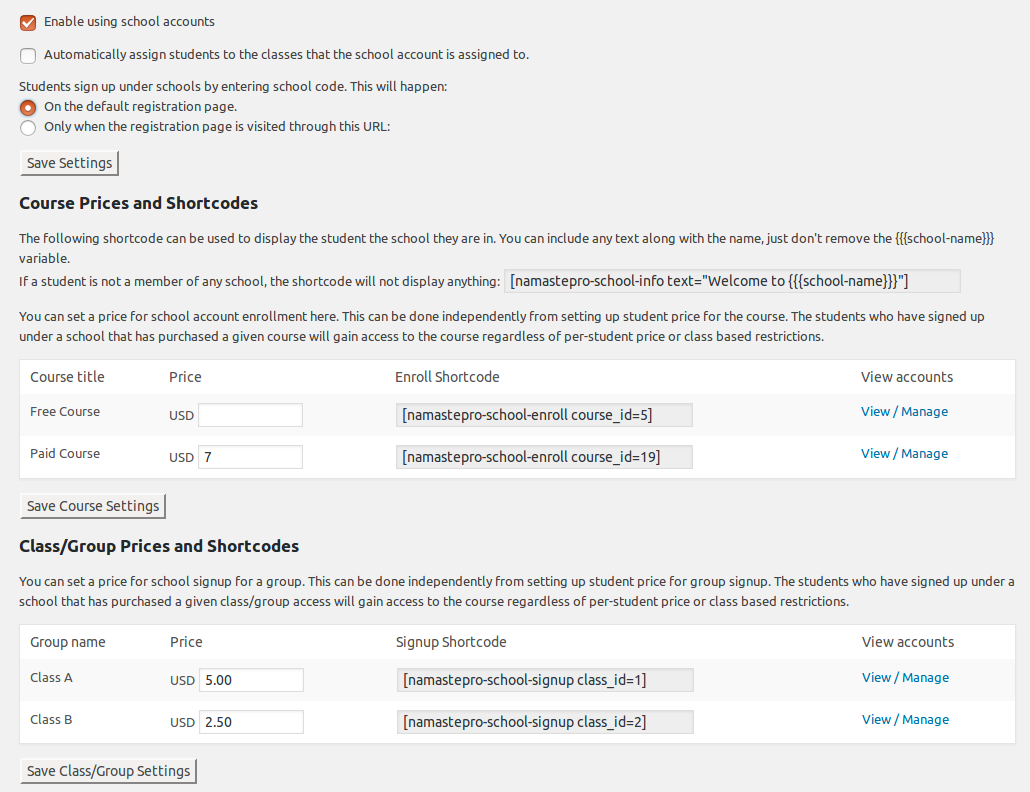
Let’s elaborate:

  • The option “Automatically assign students to the classes that the school account is assigned to” will automatically sign up any student registered under the school in the classes/groups the school has purchased as school account. If you don’t select the option the students will still be able to sign up the classes manually. If some of the classes requires a signup fee, the fee will be void for the school student and they’ll be able to sign up for free.
  • The second option defines whether your default WordPress registration page will allow signup under a school or not. If not, only a registration page visited with the special URL will allow such sign up. The URL is also available in the School’s dashboard so your clients can give it to their students.

Under the global settings you’ll see your courses and classes / groups. For each course or class you can define a price for school sign-up. Use the corresponding shortcode to publish a sign-up button anywhere on your site. Signing up as school is possible only through this button. If you want to charge for school signups make sure you have entered some payment settings in your Namaste! LMS settings page. Currently school account signup is integrated with Paypal and Stripe payments and you can’t use any of the additional payment bridges for other gateways.

For each course or class you can see and manage the accounts signed up as school – add an account manually, or remove an account.

At the top of the course you will see the welcome shortcode. You can use it anywhere on a page, before namaste-mycourses shortcode for example, or in your theme header to display a greeting for school students. It can help them know the school name they signed up under. The school name is defined by the school account owner in their school dashboard.

The School’s Dashboard

Once someone registers as school under any course or class/group, they get the School’s Dashboard. It’s called My School Page and a link to it becomes available under My Courses menu in their dashboard.

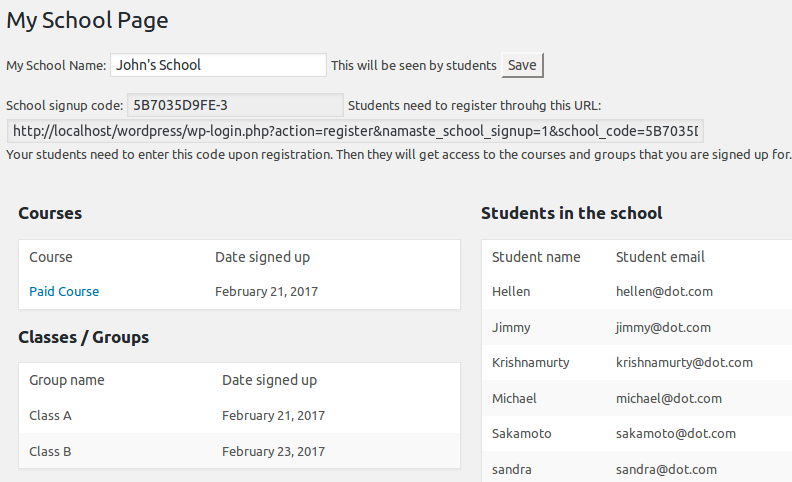
The dashboard lets them:

  • Set a school name. The school name can be displayed by the shortcode you as admin can use (as explained in the previous section).
  • Get the school signup code and signup link. They can send this link to students they want signed up under them.
  • See classes and courses they signed up for.
  • See students signed up in their school.

Student’s Registration and Access

A student that signs up under a school is a regular Namaste! LMS student. However he gets access to the courses and classes/groups that the school account has signed up for. Let’s elaborate:

  • When a school account has bought a paid course, all students of the school can enroll that course for free. Students will never be automatically enrolled in a course however – they need to click the Enroll button.
  • When a school account is signed up for a class/group access, the students of the school will:
    a) be automatically signed up for these classes upon registration IF this option is selected on the Manage School Accounts page by the site admin
    b) be able to sign up for free for all these classes even if there is a fee otherwise.

The school accounts feature is in beta stage. There is a lot more to come in terms of reporting and flexibility. We welcome your feedback.

Assign Badges for Completing Courses

If you click on the Manage Badges menu you will get to a page that lets you create badges for user’s achievements in the LMS.

To assign a badge you may require a given course to be completed. If you have selected to use a grading system in the Namaste! LMS Settings page you can also require a specific grade to be achieved to earn the badge.

If you also use points system, a certain number of points may be required too.

badge

All badges in Namaste! PRO can be also assigned as Open Badges. You just need to enter your issuer settings and fill graphic URL and criteria URL for the badge.

There is a shortcode that lets you list all users who earned a badge.

Reordering Courses and Lessons

The PRO plugin comes with an easy drag&drop interface to reorder your courses and lessons. The order you select will affect how “My Courses” page looks in the student’s dashboard if you use such. It also affects the shortcodes that list lessons in a course.

The shortcodes namastepro-prev-lesson, namastepro-next-lesson, and namastepro-first-lesson to generate easy navigation links through the lessons. There is a checkbox that can automatically replace the old navigation shortcodes from the free version if you have already used them.

reorder

Configure Delayed Access to Lessons

You can configure delayed access to lessons to ensure sequential delivery of the content. This may also be useful if you are selling time-based membership to the LMS using another plugin.

delayed

For each lesson you can define how many days must be passed from selected action before the student can access the lesson. Here are the supported action types:

  • The student starts the course
  • The student started to read another lesson from the course
  • The student has completed another lesson from the course

This way you can configure any kind of dependencies to ensure student will go through all the content in the desired order.

Classes / Groups

The classes in Namaste! PRO allow you to segment your users in different groups just like in a real university. Then you can give access to different courses in each class, so for example your Math students don’t access your Music courses, or your free students don’t access the PRO courses.

By default each course is accessible to all students but if you assign a course to a class, it becomes accessible to only the users in that class and other classes that include the course.

Note that “accessible” means the user can enroll in the course. Course main pages in Namaste! LMS are always visible and you won’t make them invisible by putting them in a class. The purpose of course pages is to advertise your course – lessons are the real content and they require enrollment to be accessed.

class

How do you assign users to classes?

  • User can be automatically assigned to the class during registration
  • At the time of creating the class you can automatically assign all your users to it.
  • You can let users sign up manually. To do this you need to allow the checkbox and publish the class signup shortcode somewhere on your site.
  • You may choose to charge for signing for a class.

What about the class managers or teachers?

Namaste! LMS lets you specify user roles that can administrate the content and manage their own courses (learn more). With the PRO addon you can also limit their access to the courses and students that belong to a given class. Here is how this works:

By default the users with a role enabled to manage the LMS will have access to all the material (accordingly to the fine-tuned settings for the role of course). But by assigning the user as class manager you restrict their access to the courses, lessons and assignments that belong to this class.

So if you want to have different teachers for all of your classes you need to assign all users of the selected role to a class.