Student Reviews on Courses

From version 2.5.5 Namaste! LMS supports student reviews on completed courses. The option is enabled per course basis so you can keep it off for some courses:

checkboxes to accept reviews

If you select the checkbox to hold reviews for moderation, the reviews will not be displayed before you approve them.

Just enabling the checkboxes will not allow students to place reviews. You need to also use the shortcode where X is the course ID. The review box will be shown in the place where you have pasted the shortcode:

form for submitting review

The form will appear only after the student has completed the course. For this reason it’s better not to place any text like “Please review this course” before the shortcode. Instead, enclose it in the shortcode so it appears along with the form only when appropriate.

After the student has submitted a review, they are not able to change it or submit another.

By using the   you can display the latest 10 reviews on the course page (or any other page).

This is how the published reviews look:

On the admin side

The pending and published reviews will appear in the Student Reviews page in your Namaste! LMS menu. You can filter them by course and status.

You can delete reviews any time and approve these who are pending approval:

Manage reviews page

If you are using classes / groups from Namaste! PRO the class managers will have access only to the reviews for courses, accessible by them. This in case you have chosen to enable access to reviews at all for their role (From the Namaste! LMS Settings page -> Roles that can manage -> Fine-tune these settings).

Creating and Assigning Quizzes and Exams

To avoid reinventing the wheel Namaste! LMS integrates with two powerful plugins for creating tests and quizzes:

  • Watu – fully functional free plugin sufficient for most simple quizzes
  • WatuPRO – the most powerful WordPress quiz plugin priced between $47 and $137

Choose one of these plugins for your quizzes. You can start with Watu and upgrade to WatuPro any time you decide.

Getting Started

You have already created some courses and lessons. Now you want to start creating some exams and complete lessons based on them. To do this you need to install and activate the quiz plugin Watu or WatuPRO. Once activated go to Namaste! LMS Settings page and select that you want to use the plugin to handle exams / tests:

There are a couple of self-explanatory settings which you can select for better integration.

Creating Your Tests

To create your tests you need to go to the Watu or WatuPRO link in your administration and create them. Both plugins are very intuitive and have quick getting started guide to help you start creating your tests.

When you are done, don’t forget that the tests should be published – either by placing the shortcode inside a post or page, or even inside a Namaste! LMS lesson, or by seleting “Automatically publish this quiz…” checkbox at the time of saving it:

Assigning a Test to a Lesson

Once you have published one or more tests you can assign each of them to a lesson in Namaste! LMS. Go to Lessons -> Edit Lesson and you’ll see the following selector:

It lets you select a single exam that will be required to be completed in order to complete the lesson. This is optional: you can and probably will have a lot of lessons that do not require any test to be completed.

Selecting “Grade” is also optional and will be shown only if you have defined grades for the test in Watu or WatuPro. You can select one or more grades to be required to consider the lesson completed. In the above example we require “Passed” grade. But if your test has grades like A, B, C, D, F maybe you will allow A, B, or C to be the grades that ensure passing the lesson.
Be careful: if you require certain grade(s) you probably have to allow multiple attempts on the test (both Watu and WatuPRO have such setting) – otherwise a student who fails to achieve any of the desired grades will never be able to complete the lesson!

Grading a Lesson Based on Test

Maybe you have noticed the checkbox on the image above: “The grade from the quiz automatically becomes grade for the lesson…”. The checkbox becomes available only if you have selected “Use a grading system” in the Namaste! LMS Settings page:

In order to successfully transfer a grade from the test to the lesson (in the Namaste! LMS gradebook) you need to have same grading systems in Namaste! LMS and in the quiz. For example if you have defined Failed and Passed as quiz grades, then your Namaste! LMS grading system should only contain Passed and Failed.

Another example, here’s a commonly used grading system:

This means the quiz should also have such grades if you want them to be automatically transferred. So if the user gets “B” on the test, they’ll get B on the lesson. The grade title in Watu / WatuPRO should be exactly “B” in this case. Not “B+”, a word like “Good”, or a number.

Navigation and User Interface

The easiest way to link from the lesson to its required exam is to use the [namaste-todo] shortcode inside the lesson. This way Namaste! LMS will automatically output information and links to everything that is required – assignments, exam, admin approval, etc. At the end of the exam, using the “Final page / Quiz output” box, just give a link back to the lesson. When the user completes the test they’ll be taken back to see that the test is done and (maybe, depending on your requirements) the lesson is also completed.

Alternatively you can of course just link to the exam from the lesson contents, but this link will not dynamically hide when the test is completed.

Grading

The grading system in Namaste! LMS can be optionally enabled from the Namaste! LMS Settings page. There is no fixed grading system, neither predefined choices so you can use anything you want.

In this article we’ll use one of the most common grading systems in the world with five letters: A, B, C, D, F. You can of course to choose grades like A-, B+ etc, a numeric grading system from 2 to 6 for example, a simple system having just “Fail” and “Pass” grades and so on.

Setting The Grading System

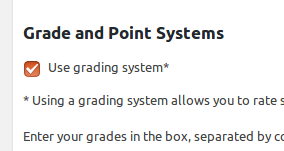
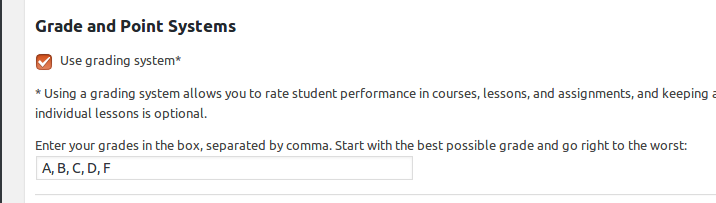
To configure a grading system you need to go to Namaste! LMS Settings page and check the checkbox as shown below:

grading-system

Spacing between commas does not matter and all the spaces will be trimmed from your grades (we have intentionally misplaced one of the commas in the example above).

Once this is activated a menu “Gradebook” will appear under your Namaste! LMS menu. Upon selecting a course you will be able to see all students in it and assign grades to their lessons and courses.

Grading Assignments

Assignments can be graded by teachers / managers from the View Solutions page. These grades will then appear in the gradebook next to the lesson grade selector. They will not automatically grade the lesson but will be shown there to help the teacher decide about the lesson grade.

Grading Lessons

Lessons can be graded manually in the gradebook.

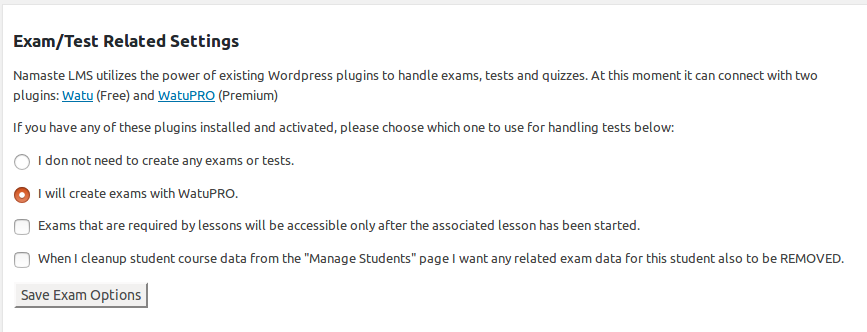
They can also be graded automatically if you have assigned a Watu / WatuPRO quiz to the lesson.  How does this work:

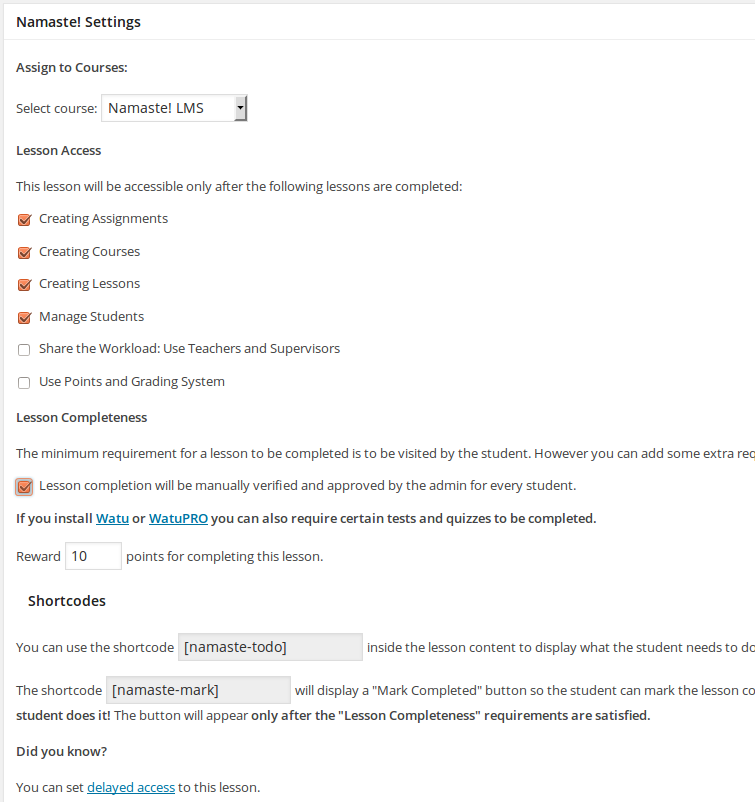
1. In the Edit Lesson page select that the quiz is required to complete the lesson:

quiz-lesson

2. It does not matter if you select specific grade(s) from the right selector. They have relation only to completing the lesson, not to grading it.

3. Select the checkbox below as shown so the grade from the quiz is transferred as lesson grade.

For this to work your quiz grade titles should match exactly the grades in Namaste! LMS. As you see in our example, quiz grades are A, B, C, D and F. So if the user achieves B on the quiz AND your grading system in Namaste! LMS contains grade “B”, the grade from the quiz will automatically become a grade for the lesson.

Another example: if you have entered the Namaste! LMS grades as “Passed, Failed” your quiz grades should also be “Passed” and “Failed”.
 

Grading Courses

Courses can be graded manually in the gradebook.

Courses can also be graded automatically as an average from the lesson grades. To do this, on the Edit Course page select the checkbox that says “Automatically grade this course based on its lesson grades”:

autograde

When this is select grading will automatically happen at the time of completing the course. The grades of all the graded lessons will be gathered and an average grade will be found based on them. This happens by automatically assigning points to each grade position, then finding the average of these points and figuring out the corresponding grade. The following illustration explains it visually:

grading

The left side of the image shows how the selected by you grades are assigned points behind the scene based on their position (lowest start with 0 points and then it adds 1 point for each grade up). Then we collect the points for all lesson grades and divided by the number of lesson. The result is rounded to a whole number and the grade that has this number of points is assigned to the course. Lessons that have no grade assigned do not participate in the calculation and don’t increase the number of lessons the system divides on.

One important thing to note: since this calculation happens at the time of completing the course, a grade which is given to lesson after that will take no effect. So if your latest lesson triggers course completeness and you want it to participate in the grading, it should be graded before completing the lesson – either manually, or automatically via assigned quiz.

Use Points and Grading System

You can choose to grade your students performance in two ways: by assigning points for achievements (like completing course, lesson, or assignments), and/or by grading them like in school.

grade-points

The points users collect go to their balance. It can currently by used as a badge criteria in Namaste PRO and can be displayed on the site. There is more to come on points.

The grading system can be used inside your Gradebook page to manage a real gradebook. Each student can have individual grades for each lesson and / or one final grade for the whole course.

Share the Workload: Use Teachers and Supervisors

Namaste! LMS lets you involve other people in the LMS management process. From the Namaste! Settings page you can enable other user roles to mange the LMS.

lms-managers

Just select the desired roles under “Roles that can manage the LMS” section.
Then you can can go to the “Fine tune these settings” page and additionally specify what these user roles do. For example you can let some roles manage assignments, but not courses and lessons. Other role can be able to create lessons but edit / delete only the lessons created by them, and so on.

fine-tune

Once done, all you need to do is to create user accounts for your staff and send them their account details.

Creating Certificates

From the Certificates menu you can create any number of certificates that the user can achieve upon completing courses. Each certificate can require one or more courses to be completed. Once the courses are completed the certificate is automatically assigned.

If you want to create the certificates in PDF format you can use our free PDF bridge plugin.

There are several variables you can embed inside the certificates to customize them.

create-certificate

If you need certificate designs you can check our free WatuPRO Certificate Templates. They are created mostly for the WatuPRO Quiz plugin but can be easily adapted for the LMS as well.

Manage Students

From the Students menu you can see all students enrolled in a given course. You can manually enrol a student. You can approve or reject enrolment requests (for courses that require admin approval).

The same page will show you the status of each lesson for each student. When the status is “In progress” a popup box will display the to-do items for it.

You can cleanup the completed status of the course so the student can enrol again in the same.

Creating Assignments

Each assignment belongs to a course and lesson, so from the Assignments menu you need to first select course and lesson. Then you can create assignment for it.

This is pretty simple – just write the requirements you have and the students will be able to submit their solutions. There is an option to allow file upload as a solution to assignment.

create-homework


Note that by default assignments are optional. If you want a homework to be approved  before the associated lesson can be completed, you need to select the assignment in the Edit Lesson page.

Every user with privileges to administrate the LMS can review and approve or reject assignments on the lessons.

Creating Lessons

To create a lesson go to the Lessons menu under Namaste! LMS and create one. All the content and media you want to include can be included inside the lesson just like in any regular WordPress post. Any content provided by third party plugins (usually through shortcodes) can also be included.

Each lesson has:

  • Course it belongs to
  • Lesson access setting. At the time of creating it says that there are no other lessons, but once you save it, you will be able to see all other lessons in the course. You will be able to select some of them to be completed before this course becomes accessible.
  • Lesson completeness. You can require manual approval by admin, completed assignments, or a Watu or WatuPRO quiz to be completed with given result.

create-lesson

There are also two shortcodes you can use:

  • The namaste-todo shortcode will display the items still required to have the lesson completed. This may be a quiz, assignment etc.
  • The namaste-mark shortcode lets you include a “Mark as completed” button so the student can decide themselves when the lesson is completed. If such button is included in the lesson it will not be marked as completed until the student does it! The button will appear only after the “Lesson Completeness” requirements are satisfied.


Note that lessons by default don’t show up on your homepage. If you wish to show them, you need to enable the following setting at Namaste! LMS Settings page:

Creating Courses

To create a course in Namaste! LMS go to the Courses menu and create one. The courses are just custom WordPress posts so the interface for creating them will be familiar to you.

Several shortcodes can be used to help you with the course:

  • The shortcode namaste-enroll will display enroll button for logged in users. For non-logged in users it will display text “You have to be logged in”
  • You may want to display enroll buttons for all your courses in a separate page – for example in table or something like that. To do this you need to use a shortcode like namaste-enroll course_id=X where X is the course ID. You can find the exact shortcode for your course on the Edit Course page.
  • The shortcode namaste-course-lessons will display all the lessons available in this course. You can enable various sorting options, check the internal Help page under Namaste! LMS for more information on this and all shortcodes.
  • The shortcode namaste-todo displays the required lessons that has to be completed to complete the course. Courses that are already completed by the logged in user will not be shown here.

Under the area for writing content, there is a box with Namaste-specific settings.

create-course

In addition to the shortcodes you can decide whether you want users to be able to enroll to the course themselves or only the administrator will be able to enroll them (or approve their requests). Students can enroll either by clicking the button on the course front-end or through the My Courses menu in their dashboard.

Each course can have pre-requisites, i.e. it may require other courses to be completed before the student can enroll.

You can also select which of the course’s lessons must be completed to complete the course. The course doesn’t require all lessons by default, so you can make some optional.

Note that courses by default don’t show up on your homepage. If you wish to show them, you need to enable the following setting at Namaste! LMS Settings page: