What’s In Namaste! Reports

This is not so much a “how-to” lesson because running the reports is as simple as clicking the “Advanced Reports” link in your Namaste! LMS menu. This lesson will introduce you to what is available in the reports.
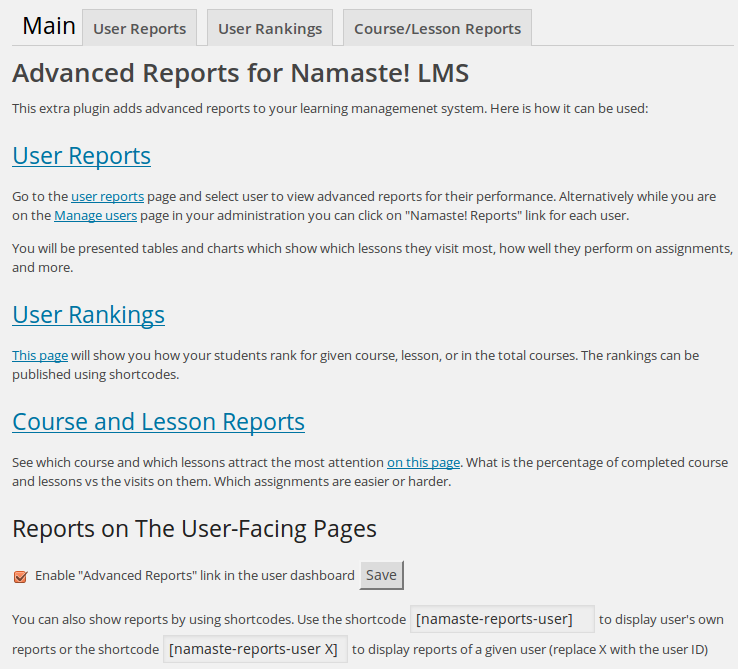
reports

User Reports

For each student in the system you can see a chart showing their page views per course and lesson. A history of all their actions will show you when they started and completed a course or lesson, submitted a solution to assignment and so on.

A detailed breakdown table displays pageviews, solutions to assignments, grade, and more metrics for each lesson in the course.

The User Reports page for every user is also accessible from your WordPress Users page.

Each user reports page can be exposed on the front-end using a shortcode.

User Rankings

These are leaderboards showing how your students rank by number of courses completed, number of lessons completed, pageviews, average grade or points earned.

All these reports are also publishable by shortcodes.

Course / Lesson Reports

These reports are course / lesson – centric. Show total page views, page views per student, average performance in the course, number of students started and completed, and more.

The whole Advanced Reports page can also be enabled in the user’s dashboard  or by shortcodes as well.

How To Use Namaste! Connect

This module adds a new menu item under your Namaste! LMS menu. It’s called Namaste! Connect and presents you a single page with several controls:

Emails sent to admin or teacher

You can choose to be notified for actions that students do on your courses and lessons. Each of the email messages is configurable and has predefined content so you can get started really easy. Just select all desired checkboxes and save the settings.

Emails sent to student

Similar to the above, you can configure various emails to be sent to the students – for example when they have completed a course, when their solution to assignment is approved and so on.

connect-1

Dashboard notices and activity stream

Similar to the email notices you can configure the notifications to be displayed as dashboard notices. The notices can also be shown in a widget or in a dedicated page. You can add interactivity if you allow students see notices for other students.

connect-2

Comments on assignments

The Namaste! Connect module also enables comments on assignments. This setting is on the Add / Edit Assignment page and can be enabled individually for each assignment.

Assign Badges for Completing Courses

If you click on the Manage Badges menu you will get to a page that lets you create badges for user’s achievements in the LMS.

To assign a badge you may require a given course to be completed. If you have selected to use a grading system in the Namaste! LMS Settings page you can also require a specific grade to be achieved to earn the badge.

If you also use points system, a certain number of points may be required too.

badge

All badges in Namaste! PRO can be also assigned as Open Badges. You just need to enter your issuer settings and fill graphic URL and criteria URL for the badge.

There is a shortcode that lets you list all users who earned a badge.

Reordering Courses and Lessons

The PRO plugin comes with an easy drag&drop interface to reorder your courses and lessons. The order you select will affect how “My Courses” page looks in the student’s dashboard if you use such. It also affects the shortcodes that list lessons in a course.

The shortcodes namastepro-prev-lesson, namastepro-next-lesson, and namastepro-first-lesson to generate easy navigation links through the lessons. There is a checkbox that can automatically replace the old navigation shortcodes from the free version if you have already used them.

reorder

Configure Delayed Access to Lessons

You can configure delayed access to lessons to ensure sequential delivery of the content. This may also be useful if you are selling time-based membership to the LMS using another plugin.

delayed

For each lesson you can define how many days must be passed from selected action before the student can access the lesson. Here are the supported action types:

  • The student starts the course
  • The student started to read another lesson from the course
  • The student has completed another lesson from the course

This way you can configure any kind of dependencies to ensure student will go through all the content in the desired order.

Classes / Groups

The classes in Namaste! PRO allow you to segment your users in different groups just like in a real university. Then you can give access to different courses in each class, so for example your Math students don’t access your Music courses, or your free students don’t access the PRO courses.

By default each course is accessible to all students but if you assign a course to a class, it becomes accessible to only the users in that class and other classes that include the course.

Note that “accessible” means the user can enroll in the course. Course main pages in Namaste! LMS are always visible and you won’t make them invisible by putting them in a class. The purpose of course pages is to advertise your course – lessons are the real content and they require enrollment to be accessed.

class

How do you assign users to classes?

  • User can be automatically assigned to the class during registration
  • At the time of creating the class you can automatically assign all your users to it.
  • You can let users sign up manually. To do this you need to allow the checkbox and publish the class signup shortcode somewhere on your site.
  • You may choose to charge for signing for a class.

What about the class managers or teachers?

Namaste! LMS lets you specify user roles that can administrate the content and manage their own courses (learn more). With the PRO addon you can also limit their access to the courses and students that belong to a given class. Here is how this works:

By default the users with a role enabled to manage the LMS will have access to all the material (accordingly to the fine-tuned settings for the role of course). But by assigning the user as class manager you restrict their access to the courses, lessons and assignments that belong to this class.

So if you want to have different teachers for all of your classes you need to assign all users of the selected role to a class.

Use Points and Grading System

You can choose to grade your students performance in two ways: by assigning points for achievements (like completing course, lesson, or assignments), and/or by grading them like in school.

grade-points

The points users collect go to their balance. It can currently by used as a badge criteria in Namaste PRO and can be displayed on the site. There is more to come on points.

The grading system can be used inside your Gradebook page to manage a real gradebook. Each student can have individual grades for each lesson and / or one final grade for the whole course.

Share the Workload: Use Teachers and Supervisors

Namaste! LMS lets you involve other people in the LMS management process. From the Namaste! Settings page you can enable other user roles to mange the LMS.

lms-managers

Just select the desired roles under “Roles that can manage the LMS” section.
Then you can can go to the “Fine tune these settings” page and additionally specify what these user roles do. For example you can let some roles manage assignments, but not courses and lessons. Other role can be able to create lessons but edit / delete only the lessons created by them, and so on.

fine-tune

Once done, all you need to do is to create user accounts for your staff and send them their account details.

Creating Certificates

From the Certificates menu you can create any number of certificates that the user can achieve upon completing courses. Each certificate can require one or more courses to be completed. Once the courses are completed the certificate is automatically assigned.

If you want to create the certificates in PDF format you can use our free PDF bridge plugin.

There are several variables you can embed inside the certificates to customize them.

create-certificate

If you need certificate designs you can check our free WatuPRO Certificate Templates. They are created mostly for the WatuPRO Quiz plugin but can be easily adapted for the LMS as well.

Manage Students

From the Students menu you can see all students enrolled in a given course. You can manually enrol a student. You can approve or reject enrolment requests (for courses that require admin approval).

The same page will show you the status of each lesson for each student. When the status is “In progress” a popup box will display the to-do items for it.

You can cleanup the completed status of the course so the student can enrol again in the same.